MYTH: More Equals Better
People often ask me why their longer, better written, seemingly more extensive blog post is being outranked by their competitors. After all, doesn't Google favor high-quality articles?
Absolutely! And your article could be of higher quality than your competitor's, but Google doesn't think so. Why? Because you haven't sufficiently convinced Google that your article is of higher quality.
You can't just rewrite an article, throw in a bunch of extra jargon, beef up the media, sprinkle in a few more links, keyword stuff the hell out of it, and think Google will see your article as better.
Just because you have more headers, more words, more content, and more everything else doesn't mean it's better. Simply put, more doesn't equal better.
Chances are that your competitor's article is highly optimized to sufficiently convince Google of its authority on the topic.
All of that authority is lost the moment you rewrite it. And blindly writing an article without thoroughly understanding what Google is looking for isn't going to work either. Blogging is an art.
What? So, how do you convince Google that your article is better than your competitors? It's pretty simple, to be honest.
Your article doesn't necessarily need to be longer; it needs to be more in-depth. You see, Google is much brighter than it was a few years ago.
Keyword stuffing or using synonyms (LSI words) doesn't work anymore. Google knows the difference between an article with in-depth coverage of a topic and an article trying to game the system with keywords.
Google's work on the Knowledge Graph combined with Natural Processing Language means it understands all the things, entities, topics, and ideas associated with a search query.
Furthermore, Google's advanced understanding of semantics means that search results are selected to match the user's search intent.
Therefore, to rank highly in the SERPs, you need proof that your article provides the most in-depth knowledge on your topic and that it precisely matches the user's intent.
Fortunately for you, I will show you exactly how to write an article that sufficiently covers your topic and align your blog content to match the user intent of your keyword.
Whether you're a new blogger or a seasoned content marketing veteran, I promise to teach you something new.
Learning Objectives
How to Write a Blog Post That Ranks in 2022
How to Improve Your Writing Skills
How to Perform Proper Topic Research
How to Create a Complete Content Brief
How to Discover the Topics That Google Wants
How to Convince Google Your Article Is Better
How to Match Your Content to the User’s Intent
How to Write a Blog Post From Start to Finish
How to Beat Writer’s Block and Write Faster
Bonus Writing Tips to Increase Shareability
Write for Humans, Not Keywords
Before we begin, throw everything you know about keywords out the window. The old way of using keywords is long gone. Allow me to explain.
The Old Way of Using Keywords
If you wanted to rank for a specific keyword, you just sprinkled it throughout your article and called it a day. Then, whatever other synonyms (LSI words) you wanted to rank for, you threw those in too.
Now, this is referred to as “keyword stuffing.” Chances are, you've heard not to stuff your articles with keywords but are still unknowingly doing it.
What keyword stuffing ISN'T: Keyword stuffing doesn't refer to overusing specific keywords. You're wrong if you think your article isn't “keyword stuffed” because you only use your keywords a couple of times.
What keyword stuffing IS: Keyword stuffing is when you gather a bunch of keywords and cram all of them in your article without sufficiently covering your topic.
If you're still blindly sprinkling keywords into your blog posts, it's time to move on. Google has, so why haven't you?
The New Way of Using Keywords
Your ultimate goal is to write for humans, not keywords. This means putting the reader first. Your article needs to sufficiently cover a topic.
Nowadays, Google views keywords as cues for what type of content it should serve to the user. If you perform a search for “blog writing process,” Google serves informational articles that it believes have sufficiently covered the topic in its entirety.
What does this mean for you? It means throwing in the keyword “blog writing process,” and all of its synonyms aren't enough to convince Google the article actually helps the user solve their problem.
Google WANTS to serve users the best and most helpful articles. Google doesn't really care if the article has the keyword in it or not. It's almost irrelevant.
In fact, many top pages don't have the keyword they are ranking for included in their content. You've probably noticed this yourself. For example, searching for “blog writing process” doesn't yield many results matching that exact term.
Why? Because Google believes those articles best cover the topic and matches the user's search intent, regardless of keyword usage.
The bottom line: Keywords are highly useful for topic research but don't get hung up on them. Matching the user's search intent with your content is much more important.
What Is a Blog Post?
A blog post is an article, news piece, or guide published in a website's blog section. A blog post is typically educational in nature and ranges from 600 to 2,000 words in length and incorporates various media forms such as images, videos, infographics, and interactive charts.
Blog posts are a great way to share information, ideas, and tales on your website. Most importantly, however, blog posts help drive traffic to your website. Regular posting can improve brand awareness, trust, conversions, and revenue.
A great blog post can help someone through an issue, provoke thought, add to the discussion, incite laughter and provide guidance.
1. Create a Content Brief
Warning!
Before proceeding, you must understand that as bloggers, we write for humans, not keywords. If you haven't read the preface before this, I highly recommend it to get the most out of this article.
To begin, it's important to create a content brief before anything else. This will help us frame our entire blog post around user intent.
Each step below, where applicable, includes an example that I used for this article, so you can see exactly how I utilized the steps myself.
Start With a Topic or Idea
The first step to writing a good blog post is easy. Just choose a broad topic. We're going to narrow it down and fine-tune it later.
My Topic: Blog Writing
Choose an Angle
You have identified a good topic of interest. Excellent! So, what is your angle? Get specific rather than taking a broad view.
For example, you will quickly become overwhelmed if you attempt to cover a large subject like organic gardening. Instead, consider “5 Budget-Friendly Strategies For Starting an Organic Garden.”
The more unique and interesting you can swing your angle, the better. After all, nobody wants to read the same old crap.
My Angle: How to write a blog post that dominates the SERP results in 2022 using advanced on-page SEO techniques.
If you need help generating content ideas, plug your topic into BuzzSumo's content discovery tool, or check out Copy.ai's free idea generator.
Clearly Define Your Goal
Next, you want to clearly define your goal. Your goal is what you want your readers to get out of your article.
Typically, blog visitors are searching for answers, so it's in your best interest as a blogger to help them find solutions.
What will your readers learn from your article, why is it important, and how will it help them with their issues?
My Goal: Provide new bloggers with the knowledge, tools, and techniques required to write a blog post that matches user intent to rank highly in the SERPs and increase overall organic traffic.
Create a Keyword Cluster
The next step in writing a good blog post is creating a topic cluster.
What Is a Topic Cluster?
A topic cluster is a group of closely related keywords that will assist us in topic research. Remember, we're writing for humans, not keywords.
What we are NOT doing: We are not selecting keywords we want to rank for in the SERPs; that is, our goal isn't to simply rank for keywords. This is an outdated, old-school tactic.
What We ARE doing: We are selecting keywords to aid us in writing great content for humans. Our topic cluster will help us orient our content to fit the needs of our readers.
Ranking for keywords isn't our goal. We already defined our goal in step three, remember? Ultimately, however, we WILL rank for HUNDREDS of keywords closely related to our topic cluster!
How is that possible? Selecting a small cluster of closely related keywords will allow us to perform deep research to ensure complete coverage of our chosen topic.
Covering a topic in its entirety will convince Google that we're worthy of ranking for all of the closely related keywords, not just one lousy keyword. Why aim for one when you can aim for all of them?
To create a good topic cluster, we'll select one high-volume keyword and three supporting keywords related to our angle from step two.
Chose One High Volume Keyword
Using Google Keyword Planner, or whatever keyword tool you prefer, select one high-volume keyword. Don't worry about keyword difficulty! It doesn't matter.
Think of this keyword as a giant fishing net. It's the ideal keyword you would like to rank for in the SERPs. We're going to use it for topic research.
My High Volume Keyword: blog post
Choose Three Supporting Keywords
These are the supporting keywords that support your article's objectives. They're typically longer and more targeted.
My 1st Keyword: blog writing process
My 2nd Keyword: how to write a blog post that ranks
My Third Keyword: tips for writing a blog
Once you have your topic cluster, move on to the next step, where we'll analyze them for user intent.
Analyze Your Keywords
Now that you have your keywords, it's time to analyze them for user intent. This isn't a difficult task by any means, so don't sweat it.
This is just a quick check, but an important one at that. If you mismatch the user's search intent, your article won't have a fighting chance at topping the SERPs.
What is User Intent?
User intent, or search intent, is a term used to describe a search's purpose. To better understand this, let's review four basic types of user intent.
Informational
Intent: The user is searching for information.
Search example: “how to start a WordPress blog”
Transactional
Intent: The user is searching for an immediate purchase.
Search example: “buy WordPress hosting”
Commercial
Intent: The user is investigating a future purchase.
Search example: “best hosting companies”
Navigational
Intent: The user is searching for a specific page.
Search example: “cloudways login”
How to Find User Intent of a Keyword
To match the search intent of your keyword, try the following methods:
Perform a search for your keywords: Do a search for your keywords to see what types of pages are already ranking at the top of the SERPs. Ask yourself the following questions:
What are the top results? Are they blog articles? Are the results products and services? Are they online tools? Do they share any common themes or keywords? How are the results matching the search intent? Are they matching the search intent well, or does it seem off?
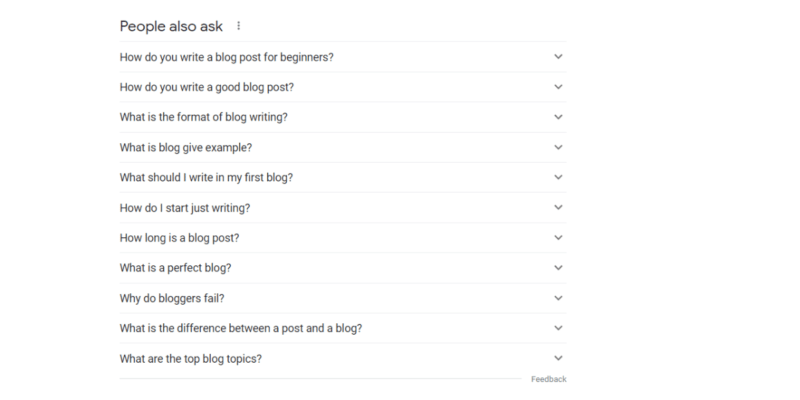
People also ask: While you're there, check out the “People also ask” section in Google. These are the most popular questions related to your seed keyword. What are people asking? What are they looking for?
Use Semrush keyword tool: Plug your keywords into Semrush's keyword analyzer to get more insightful info about your keywords, including search intent.
How to Match Content to User Intent
Matching your content to the search intent is easy!
Think about what the user wants: Put yourself in the shoes of the searcher. What are they looking for? What do they want?
A search for “quick keto casserole” is an informational search, but there's more to it than that. The user is specifically looking for something quick, not something that takes an hour.
Chances are, the searcher also doesn't want to read a lengthy intro! Put the time required to cook your keto casserole at the very top and make it noticeable.
See how your article starts to conform to the desires of the searcher? This is what you want, and Google will reward you for it. It's that easy.
Answer popular questions about your topic: Be sure to answer common questions from the “People also ask” section. Click through the questions to populate the list with more related questions.
Quick Recap Before Continuing
To aid us in creating our outline in the next step, we want to ensure we have a firm grasp of our topic beforehand.
Don't worry about including your keyword anywhere yet; it's much more important to focus on framing your post around the user's search intent.
If you've been following along, you should have something that looks like this:
Content Brief
Topic: Blog Writing
Angle: How to write a blog post that dominates the SERP results in 2022 using advanced on-page SEO techniques.
Goal: My Goal: Provide bloggers with the knowledge, tools, and techniques required to write a blog post that matches user intent to rank highly in the SERPs and increase overall organic traffic.
High Volume Keyword: blog post
Supporting Keywords: blog writing process, how to write a blog post that ranks, tips for writing a blog
Keyword Intent: Informational
Keyword Research Insights: Beginner bloggers looking for easy-to-follow steps on how to write and format blog posts with examples.
Other Insights: Results are boring, unoriginal, and missing important on-page SEO information.
Once you're satisfied with your topic cluster and topic analyses, you're ready to create your outline.
Create an Organized Outline
By now, you should have an in-depth idea of what your article will cover, so this should be a breeze for you.
What is an Outline?
Think of your outline as the skeleton of your blog post. The outline is the bare-bones structure of a blog post, complete with headings and sub-headings.
Your outline will determine what goes into your post, in what order it should be presented, and how long each section should be.
Why Are Outlines Important?
The outline is what helps keep you on track while writing a blog post so that it doesn’t turn into a rambling, disorganized mess. Outlines also help you avoid writing too much or too little for your blog posts.
It's easy to get lost in the details of what you're writing about. But when you have an outline, it helps keep those details in their place, so they don't distract from the main point of your post.
For example, here's the outline I created for the post you're reading now.
My Content Outline
- Write for Humans, Not Keywords
- The Old Way of Using Keywords
- The New Way of Using Keywords
- What Is a Blog Post?
- Create a Content Brief
- Start With a Topic or Idea
- Choose an Angle
- Clearly Define Your Goal
- Create a Keyword Cluster
- Analyze Your Keywords
- Quick Recap Before Continuing
- Create an Organized Outline
- Write the First Draft
- Write How You Talk
- Make it Easy to Read
- Make Your Content Scannable
- Use Visual Components
- Add Your Call-to-Action
- Craft an Attention-Grabbing Intro
- End with a Conclusion
- Polish, Tweak and Optimize
- Optimizing Your Article With NLPs
- Polishing Your Article
- Configuring Your Settings
- Top It off With the Perfect Title
- Use a Number
- Use Positive or Negative Sentiment
- Use a Power Word
- Don't Write Clickbait
- Conclusion
Don't half-ass your outline! The more organized and complete your outline is, the better. Your article will practically write itself if done correctly.
Pro Tip!
Want to speed up and supercharge your content brief with powerful competitor insights? With Scalenut, you can:
- Find targeted topic clusters
- Expedite writing with 40+ AI writing templates
- Get word, image, and heading count suggestions
- Perform deep topic research to outrank your competitors
- Create outlines with headings from the top 30 URLs
- Add top questions from your topic to your outline
- Add top citations from your topic to your outline
- Analyze NLP-extracted key terms on your topic
- Write faster with advanced AI writing technology
- Focus on content creation instead of keyword research
2. Write the First Draft
Now that you have your content brief, it's time to begin writing! Using your outline, expand on all your headings to create a first rough draft.
It doesn't matter where you start. Pick a heading you want to tackle and let the words spill out of your brain onto the keyboard.
Here are some tips to keep in mind while writing your blog post:
Write How You Talk
Writing as though you are talking with your reader makes them feel like they are having a conversation versus reading a blog post. Don't be afraid to add your own personality to your posts. It's what sets you apart from others.
Make it Easy to Read
The average person doesn't read a blog post word for word. They scan them instead for the information they are seeking. For this reason, it's essential to format your posts so that they're easy to read.

Make Your Content Scannable
Ensuring that your content is scannable makes it easier for your readers to get the information that they need.
Use a table of contents: Using a table of contents allows readers to quickly screen your article for information. My favorite way to do this is to use the SimpleTOC WordPress plugin. It's lightweight and will not slow down your website. You can check it with WP Hive yourself.
Write shorter sentences: Shorter sentences are easier to read and digest. Longer sentences are overwhelming and challenging to follow.
Make use of subheadings: This allows your readers to identify the main points of your article and will allow you to stay focused and organized as you write.
Use bullet points: Instead of listing items in a drawn-out sentence, use bullet points to make your message clear, concise, and easier to understand.
Keep paragraphs short: Let's face it; long paragraphs aren't fun. I recommended you use 2-4 sentences in most of your sections, with a few paragraphs of one to grab the reader's attention.
Use appropriate spacing: Use at least 30px of spacing between paragraphs to create lots of visual space.
Incorporating these tips into your writing will increase the readers' likelihood of reading the entire blog post.
Use Visual Components
Simple images can make articles more engaging and exciting. You can easily convey what words cannot with a single image or screenshot.
In addition, visuals provide a pleasant break from monotonous words and refocus the reader's attention. With that said, be certain to use images only when it makes sense!
3. Add Your Call-to-Action
Don't forget to add your call-to-action (CTA). This is something you want your readers to do. Many bloggers get this part wrong, and I'll explain why.
Your call-to-action should NOT be nefarious, deceitful, or framed for your benefit instead of the readers.
Your call-to-action SHOULD be something that helps your readers and is clearly framed for their benefit.
For example: Instead of asking your readers to subscribe to your newsletter, explain the benefits or what they will receive for subscribing.
For example: Instead of asking your readers to use your tool, subtly explaining how your tool can help them solve their problem is much more effective.
Whatever you decide, do NOT pressure your readers into doing anything. Not only is this ineffective, it is also disingenuous.
4. Craft an Attention-Grabbing Intro
Consider half your work already done if you can hook your readers with the intro. Your intro sets the tone for the rest of the blog post. If the introduction is boring, nobody will bother reading the rest of the article.
Some writers find it easier to begin writing the article body first and save the intro for the end (me). Writing the body of the article first will give you more insight into how to craft your opening.
You can create an engaging intro by asking a question that addresses your reader's issue or creating an intriguing mystery.
Remember to present the problem clearly, and how the rest of the article will resolve the issue at hand.
This is an awesome way to grab your readers' attention, and they will be eager to read it through to find the solution. Be sure you provide a GOOD solution, though!
5. End with a Conclusion
This doesn't need to be anything fancy; just include a small recap of the article. Consider asking a question to your readers or providing a link to additional resources.
6. Polish, Tweak and Optimize
By now, you should have a well-research article with an intro, body, and conclusion. Let's polish and optimize it for search engines.
Optimizing Your Article With NLPs
Remember when I said Google knows all the things, entities, topics, and ideas that are associated with any given search query? Well, to optimize our article for search engines, we need to include all of those things in our article.
But how do we know what to include? I'm going to be honest here; this isn't easily done without the help of a special tool that can extract NLP (Natural Learning Processing) words for us.
NLP terms are the things that Google is looking for when evaluating content. To get the NLP words we want, we will use Scalenut.
What Is Scalenut?
Scalenut is an advanced content creation and analysis tool for streamlining content briefs, researching topics, writing with artificial intelligence, and improving on-page SEO.
It's time to retire that complicated keyword tool. With Scalenut, you can focus on creating great content instead of boring keyword research.
Creating Your Content Brief
Before optimizing your article with NLPs, you MUST create a topic cluster and content brief. To begin, sign up for a free 7-day trial to access.
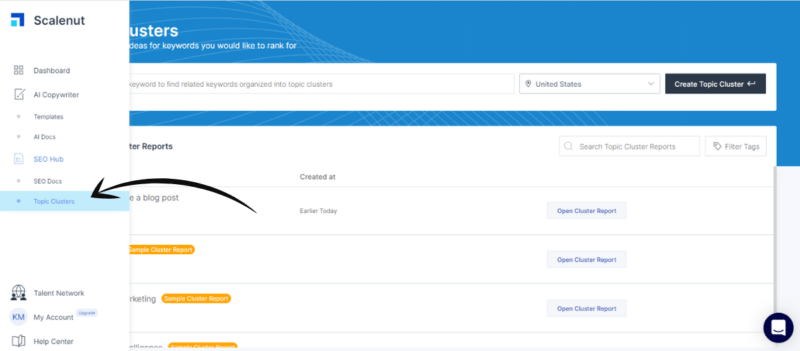
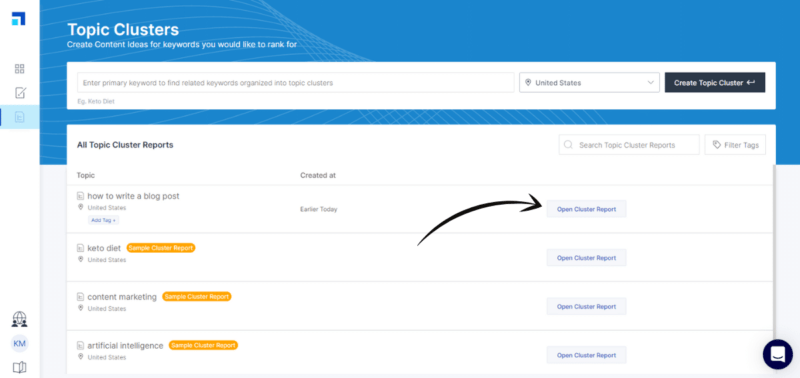
Start by navigating to the topic cluster tool, as shown below.
Next, enter the primary keyword you selected earlier in step one.
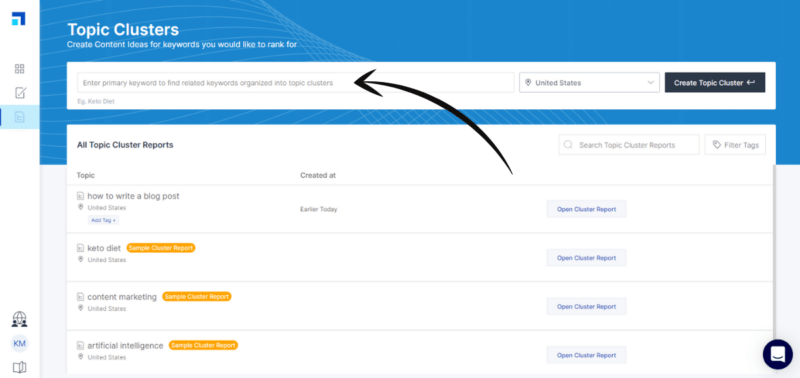
After your report finishes generating, click Open Cluster Report.
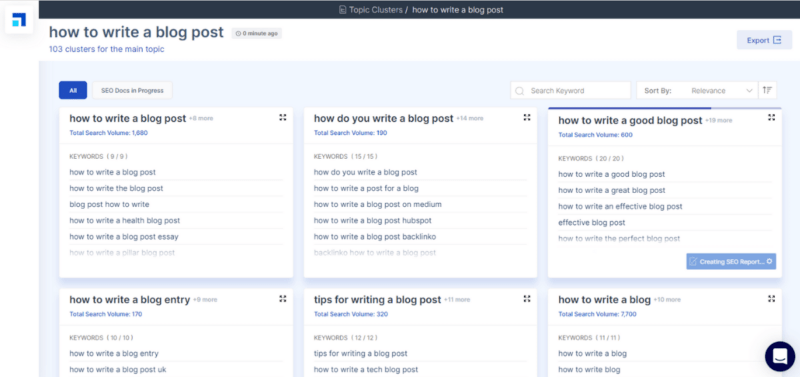
Scroll through the results and find a cluster that best matches your topic.
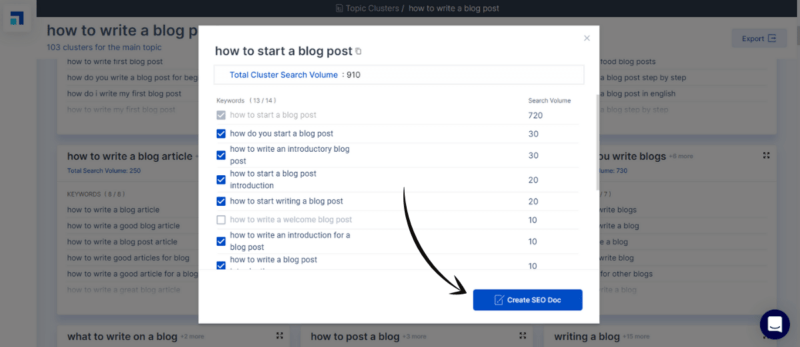
Check and uncheck keywords as desired and click Create SEO Doc.
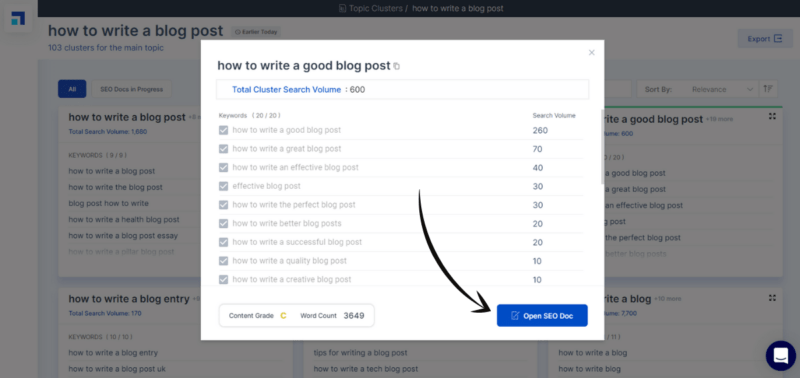
When it's ready, click Open SEO Doc.
This is your Content Brief. Here you can analyze the top pages covering your topic cluster to create a hyper-focused content brief. Let's quickly review each tab.
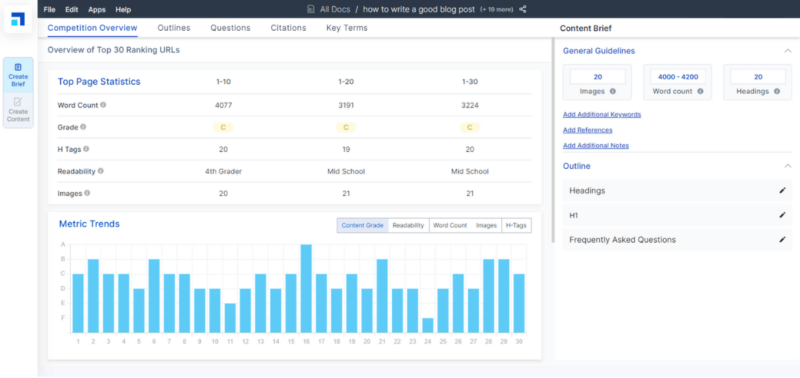
Competition Overview: In this tab, you'll find the suggested word, image, and heading counts, as well as a readability score and an average grade for the top-ranking URLs on your topic.
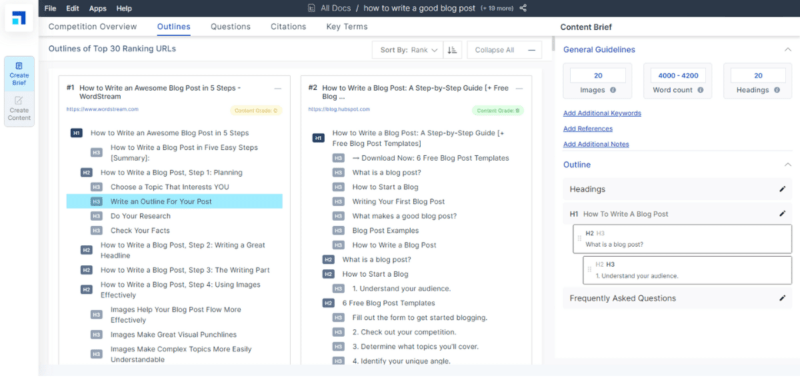
Outlines: In this section, you can scan every heading tag from the top 30 URLs and use them to build your own outline. This gives you deep topic insights at a glance! Click to add a heading and edit it to fit your needs.
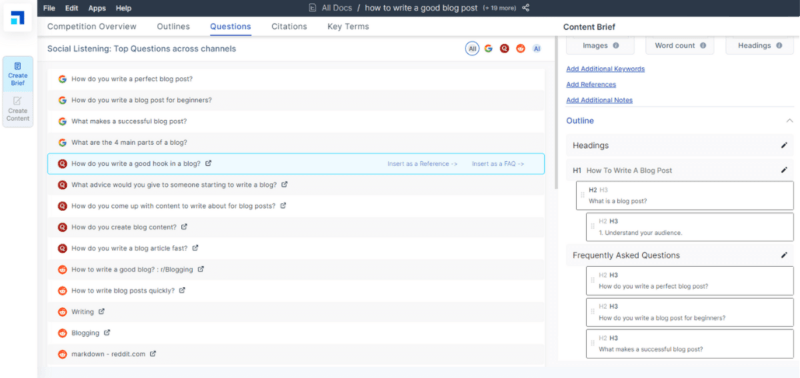
Questions: In this section, you will find the most popular questions asked across different social channels. Click to add them to your content brief.
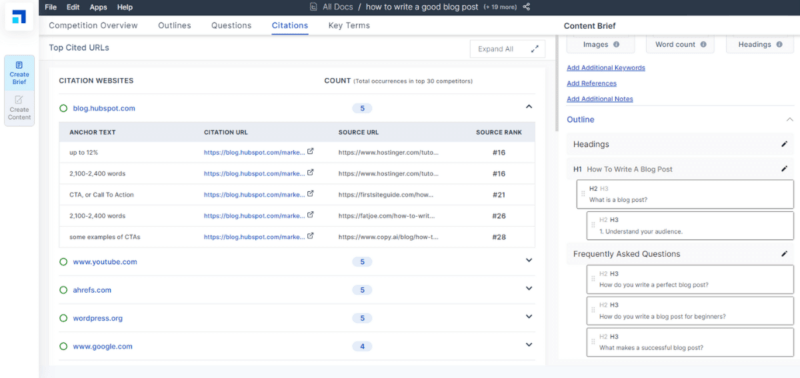
Citations: In this section, you will find the top cited URLs across the highest ranking pages on your topic. Linking to a couple of the same URLs is another way to convince Google your article is worthy to rank among the top.
Key Terms: In this section, you will find the NLP-extracted terms used by the top-ranking pages in order of their importance, complete with examples of how each term was used by each page! Bingo!
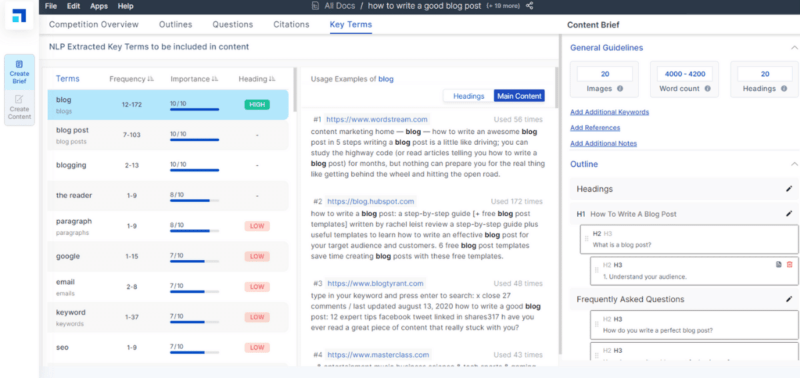
Spend some time with your content brief and flesh it out as much as possible. Don't leave anything on the table. The better your brief, the easier your writing will be.
Once you're ready, click Create Content on the left-hand side to move on to the next screen. You can run through Cruise Mode or click out to free-write.
Writing With Scalenut
You can begin writing your article using your content brief and NLP suggestions. Pay close attention to the Key Terms and suggestions at the bottom.
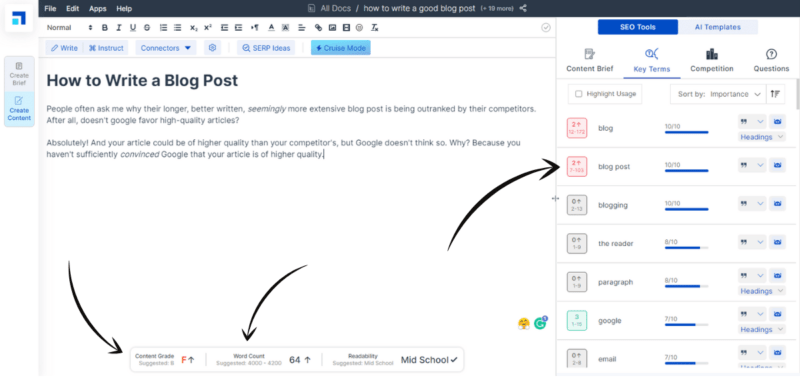
Need help writing? Use the built-in AI writer to beat writer's block! Simply click Instruct or select a Connector sentence, and the AI will write for you.
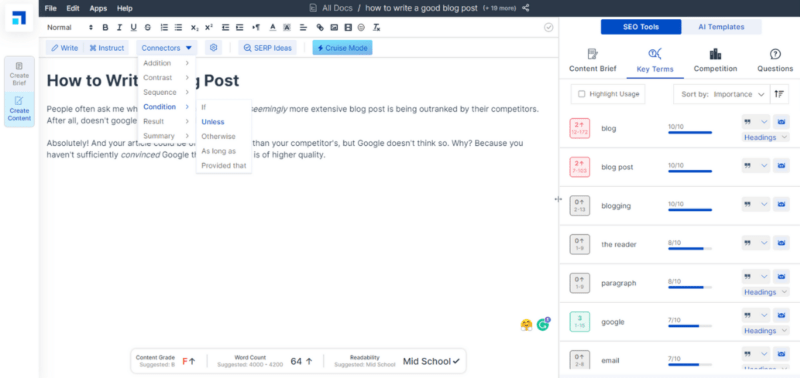
And that's it! For the best results, ensure you “green light” all of the NLPs and meet all suggested criteria.
Polishing Your Article
Nobody's perfect! Be sure to use a grammar tool such as Grammarly to ensure your content is clear and professional. Spelling mistakes, typos, and grammatical errors are easily avoidable but often overlooked.
If you don't already have a grammar tool, I wholeheartedly recommend Grammarly. Use the extension in the Scalenut editor for maximum writing efficiency.
Configuring Your Settings
Before publishing your article, ensure you set a featured image, select an appropriate category, add your tags, and fine-tune your meta description.
If you're using WordPress, Rank Math is an excellent plugin to ensure you do not miss any important on-page SEO criteria.
7. Top It off With the Perfect Title
Finally, it's time to add your headline title! This is my favorite part of the whole process. Here are five tips to use for crafting a great headline to increase CTR (Click-through Rate).
Use a Number
Research shows that web searchers' eyes are attracted to numbers. Numbers typically represent facts and give readers a measure of value.
Use Positive or Negative Sentiment
Another proven way to get more people to click on your title in the SERPs is to evoke strong emotions. Notice that I didn’t say what kind of emotions, only strong emotions.
That is, it doesn’t really matter what kind of emotions you evoke as long as the emotions are strong. Try using curiosity, fear, or nostalgia to your advantage.
Use a Power Word
Power words are just that; power words. They're freakin' powerful, man! For whatever reason, people are drawn to certain words, like “illusive,” “massive,” or odd.”
Don't Write Clickbait
Whatever you do, don't write clickbait. You must ensure you manage people's expectations. If you use “mind-blowing” in your title, you better have something that is actually mind-blowing to share.
Otherwise, your blog visitors will bounce faster than a rubber ball off of a brick wall. This can negatively impact your SEO (Search Engine Optimization) efforts, so don't do it.
Conclusion
There you have it! Writing a good blog post is simply a matter of deep topic research and matching user intent. Don't stress too much over the keywords. If you're new to blogging, remember to write for humans, not keywords.
For anyone wondering, here's my final article in Scalenut's content editor. I could probably trim a few words and squeeze in a few more Key Terms, but I don't see any benefit to the reader at this point.

If you have any questions, please drop me a line in the comments section below!