Do you need the best WordPress hosting with staging environments?
I'm sure you do! You don't have to look any further; I've already done the research. It's common knowledge that staging environments are essential, but many website owners don't use them or are confused about how to use them.

There is a huge stigma about staging environments that they are often challenging to create because of their technical nature. This simply isn't true anymore due to modern web hosting solutions (and increasing competition).
It's now possible to create staging environments with just a single click, make changes, and then push those changes to your live website.
In this article, I will cover why staging environments are necessary and how to choose the best WordPress hosting with staging so easy to use it will blow your socks off!
Keep reading to find out which host with one-click staging is the right host for you!
Expand Upfront Bottom Line
Cloudways is not only the fastest host according to recent research, but their staging environment is so intuitive anyone can figure it out. Jump to the Cloudways staging tutorial here.
What Are Staging Environments
You might be wondering, “what's a staging site?”
A staging site, in simple terms, is a copy of your live website. The secure environment enables you to test any changes or new features you intend to implement in a controlled environment. Developers frequently use staging sites to test changes and update bugs before going live.
Your staging site should be identical to your live site – sharing the same plugins, settings, widgets, etc. The only difference between a live site and a staging site is that the latter is not live.
Instead, it exists in a kind of sandbox where you can test how your site would behave under real-life conditions. The results of anything you do in the staging environment do not affect your live website until you push it live.
Who Should Use Staging Environments
Everyone! Okay, not everyone. Only those with a website. All website owners should have a staging environment. Furthermore, staging sites are absolutely crucial for any website that generates income or provides information or services for visitors.
If your website is unavailable or broken, you lose traffic, engagement, and revenue every minute. Possibly even worse is a decline in brand trust and recognition. Nobody wants to let their valuable readers down.
Using a staging site is an easy and cost-effective solution to these problems. And like I said before, it isn't exactly rocket science as it once used to be.
Top Hosts With Staging Environments
In order to find the best WordPress hosting provider with staging
The good news here is that I have a starting list of top hosts to pick from. Let's take a look at the top 10 hosts from the below WordPress hosting benchmarks.
From the top benchmarking results, we have the following hosting providers to choose from (in descending order):
- Cloudways
- Pressable
- ScalaHosting VPS
- WPMUDEV
- HostArmada
- Templ
- WPEngine
- A2Hosting
- FastComet
- MDDHosting
The above hosts were chosen based on overall user sentiment and performance. According to my extensive hosting research and analyses, these are the top WordPress hosts in North America. All of them are excellent, but which ones are the best for staging?
Number 1 Host With One-click Staging
Cloudways
Cloudways staging is intuitive and beginner-friendly.

Well, what did you expect? Cloudways is the fastest hosting provider according to my benchmarks and boasts a 4.7 on Trustpilot. They also provide an easy solution for staging and don't lock you into long contracts (which is really convenient if you ask me).
Any way you look at it, Cloudways is just a great option. Some of my favorite features include:
- Pay-as-you-go payment model
- Unlimited apps (websites)
- On-demand vertical scaling
- Blasing fast speed and performance
- Awesome customer support (seriously)
- Easy migration with free plugin
- Free SSL certificates
How to Setup Cloudways Staging Environment
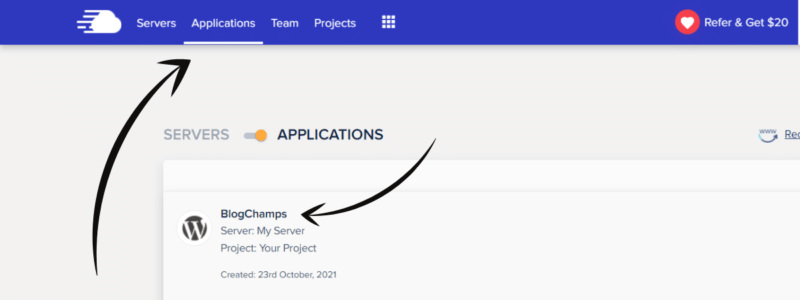
1. Select your Application
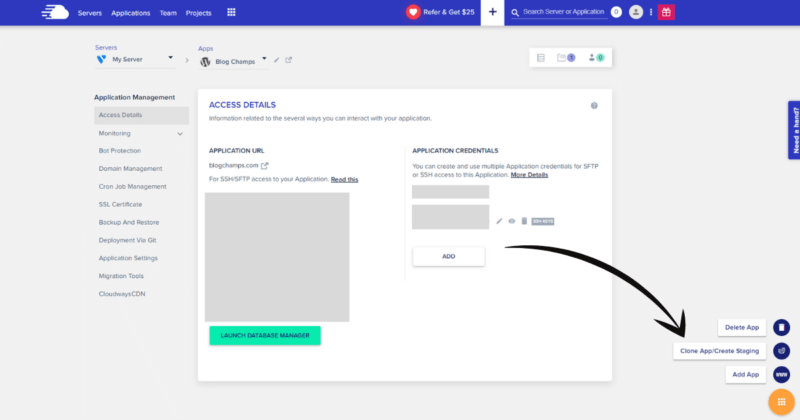
2. Click Clone App/Create Staging from the icon in the bottom right corner.
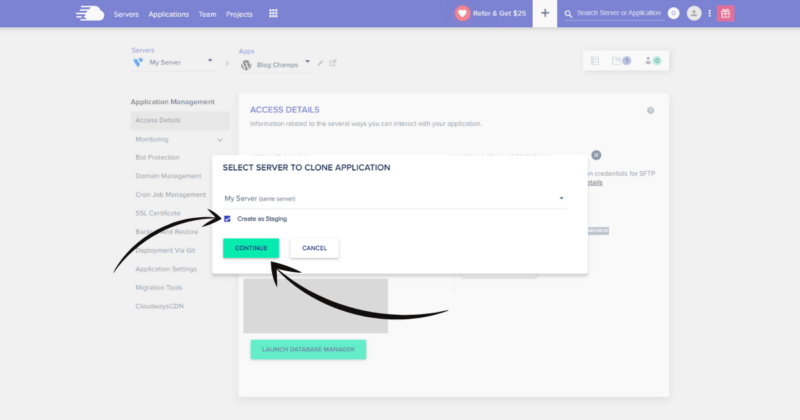
3. Select your server from the dropdown, click Create as Staging, and click Continue.
4. Wait for your application to be created. It will be an exact clone of your live website that you can log into and edit as you please.

5. When you're ready to push your staging website to your live website, navigate to Staging Management > Push.
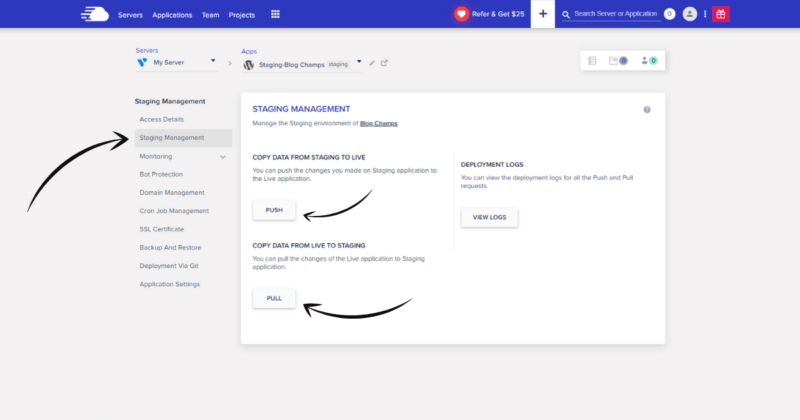
You can also pull your live website to the clone to make new edits in the future. There is no need to create new clones! Just pull the data, make your changes, and then push it live. And that's it. I told you it was pretty easy.
Runner-up Hosts with One-click Staging
Cloudways Not for You?
If Cloudways isn't for you, that's okay! Everyone has different requirements for hosting, as there isn't a one-size-fits-all hosting solution. I get it. If Cloudways isn't for you, I have some other WordPress hosting recommendations for you to check out. Below are a couple of my other favorite hosting providers. If I had a need for more than one host, I would be using them as well, haha.
HostArmada
If you're looking for value and traditional cPanel hosting with one-click staging, I highly recommend HostArmada. They offer incredibly powerful managed WordPress hosting on the cloud with top-notch performance and speed. Setting up a staging environment with HostArmada is made easy using the Softaculous WordPress installer for cPanel.
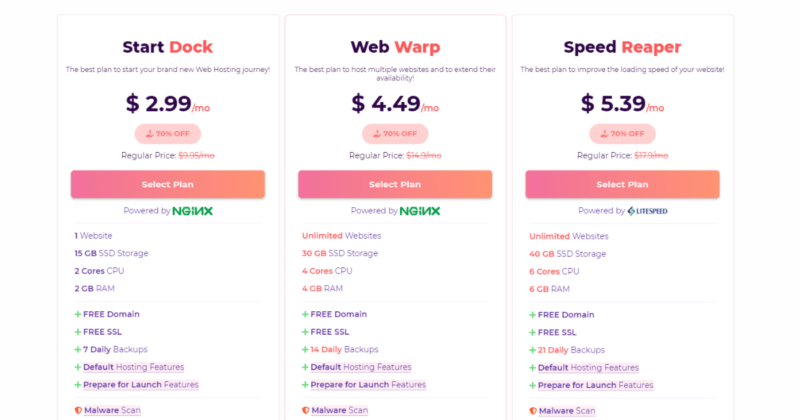
Their plans start at 2.99/month for their 36-month Start Dock package which is an unbeatable deal for soon-to-be new blog owners. They also offer free SSL certificates and provide a free domain with every plan. Noice!
Templ
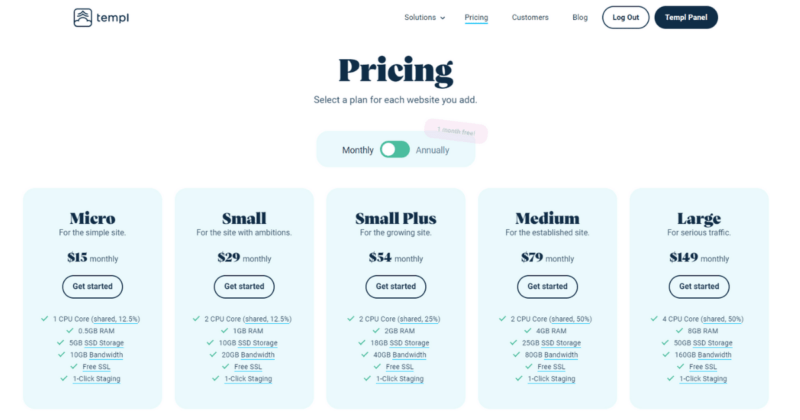
Another great WordPress host with free staging environments is Templ. They provide a more custom yet highly streamlined WordPress environment that starts at $15/month, that also includes Google's Cloud CDN. Just ask them to switch it on for you, and they absolutely will. I've done it myself. They're very friendly!
What I really like about Templ is their custom beginner-friendly control panel. While testing them a while back, I was completely blown away at how simple and intuitive everything was. Configuring a staging website with Templ is also very easy to do, and only takes a couple of clicks.
Additionally, there was almost zero propagation time when setting up my website. Before I knew it, my test site was up and running with its associated domain. It was as if they were reading my mind!
Why Not SiteGround?
SiteGround was satisfactory for the 2 years I was with them. They provided free SSL certificates, and customer support was good, but that was about it. SiteGround scored very low in speed and performance in the latest WordPress hosting benchmark tests.
Considering the ever-increasing prices of SiteGround (along with their TTFB), I think it's almost a scam these days. Although many WordPress blogs still promote them, I still refuse, and I've been much happier since migrating to Cloudways. Switch to them, and we'll both be better off, haha.
Let's not even talk about Bluehost! They were also my hosting provider many years ago before SiteGround, and they have only gotten worse since being acquired by Newfold Digital.
One of the main reasons I started this blog was to help new bloggers make more informed decisions, which is why I am telling you this from experience, learn from my mistake and pass on SiteGround. The above hosts are much more deserving of your hard-earned buck.
Conclusion
Hopefully, I was able to help you find the best WordPress hosting with staging environments that suit all of your needs. As a Cloudways user, I find their staging environment adequate enough for my needs.
The Cloudways Staging environment allows you to test new code, plugins, themes, and schemas without having to break the live site. Connecting the staging and live sites allows you to push and pull data between them with Push and Pull operations.
It really is that simple too! With Cloudways staging, you literally click Pull to pull your live data, and when you're ready to go live with the staging website, you click Push to push the staging data to your live website.
Did this article help you? If not, let me know in the comments below. I love helping people! I'll do my best to answer any questions.