Ready to start a successful art blogging business? Allow me the pleasure of showing you how to start an art blog for free!
Why This Guide Rocks?
Creating an art blog isn't difficult at all, and to be honest, blogging itself isn't too hard either. All you need to do is type a couple of words and poke some buttons on your keyboard.
Blogging doesn't require any special skills, equipment, or technical know-how; anyone can start one. Really, even an artichoke could do it.
You love creating art and everything about it, so why not blog? Why not start now if you want to make money from your passion?
You have practically nothing to lose but everything to gain. So, If you're serious about starting an art blog, it's time to make the leap.
In this article, I will guide you through each step, from starting an art blog and setting it up to generating revenue with free blogging platforms.
If that sounds good to you, then let's go! There's no time to waste!
Identify Your Niche
Before starting any online business (such as an art blog), you need to identify your niche and focus on building your brand within that specific niche. Once you're well established, you can expand into other areas.
Ideally, you would like a blog that covers a specific niche but isn't too narrow that you will run out of topics to write about. To get you started, here are some art-specific niche topics:
Photography
Art Buying & Selling
Painting
Sculpture
Literature
Theater
Woodworking
Leatherworking
Drawing
Pottery
Watercolor
Calligraphy
Coloring Books for Adults
Videography
Scrapbooking
Oil Painting
Portraits
Caricatures
Nature Art
Fine art
Manga Art
Landscapes
Contemporary
Miniatures
General Crafting
Models
Topiary & Landscaping
Digital Art
Graphics Design
Art Product Reviews
Art Teaching
Art Philosophy
Analyze Your Target Market
Understanding your target market is an important step toward knowing what kind of art-related posts to write, how to structure them, and, ultimately, which ones to post. Defining your art niche will help you better understand your readership.
Finding your target market isn't just about numbers and demographic statistics. You need to know who they are and what their wants are so you can write posts that appeal to them.
Whether you're writing articles for art connoisseurs, moms, or anyone else, the more you understand their desires, what excites them, and what motivates them, the better you'll be able to reach them.
Try to think of the problems faced by your target market and how your interest or passion can help your potential readers. What's their motive for reading your art blog? Is there a product that might appeal to them or an art museum they need to see?
Methods and Strategies
To analyze your target market of art enthusiasts, try the following:
- Visit Quora to browse the art-related questions
- Utilize a known source of statistics, such as the Pew Research Center
- Watch YouTube videos on art and listen to podcasts
- Analyze the competition and influencers or brands in your niche
- Use social media to find art-related pages
- Read books about art and get in touch with the authors
- Identify and talk to niche-specific individuals in person
- Check out the comment sections on competing art blogs
- Search for your target audience on Google
- Identify and browse online art forums
How to Start an Art Blog for Free
If you're still unsure if blogging is for you, that's understandable. The sheer thought of failure or where to even begin is enough to send many people packing their bags.
If this sounds like you, don't worry! There are a few simple ways to get your art blog up off the ground totally free with no commitments at all. But first, let's discuss the pros and cons of using this method.
Pros and Cons of Free Hosting
Free blogging platforms usually provide the hosting for you and offer paid upgrades for premium tools and features like custom domain names. This means they are free but somewhat limited in their capabilities.
While free blogging platforms are limiting in terms of features and tools, they're awesome options for newbies who just wanna get started blogging. And the best part? You can start monetizing your art blog immediately without spending any money.
Here are the top free blogging platforms you can use to create your own art blog today.
WordPress
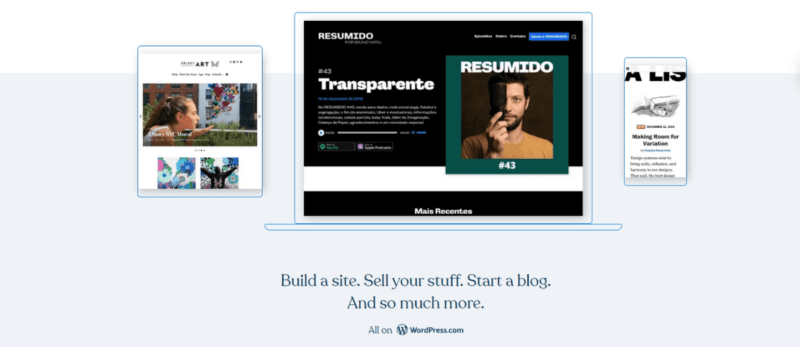
Not to be confused with wordpress.org (an open-source content management system for self-hosting WordPress websites), wordpress.com offers a quick and easy way to create a blog. By signing up for free, you can begin sharing your ideas today.
And If you want to monetize your art blog immediately, you can use Amazon and WordAds to earn money from your efforts. Yup, it's really that easy.
Blogger
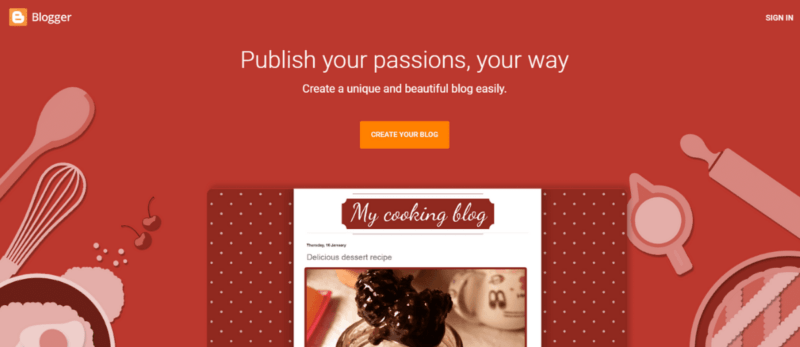
Blogger is another free blogging platform owned and hosted by none other than Google. The only requirement is a Google account to access everything Blogger offers.
And because Blogger is owned by Google, setting up your art blog to earn money through AdSense is as easy as it gets! It's the perfect combination.
Medium
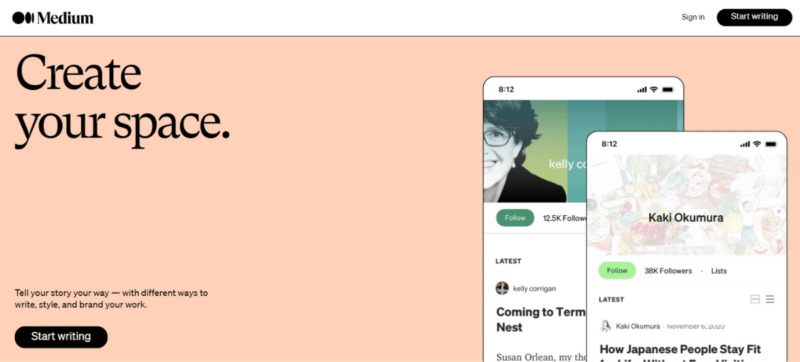
Founded in 2008, Medium is an independently-owned social publishing platform featuring ideas, stories, and perspectives from every part of the world. The best part is that once you acquire 100 or more followers, you can apply to start earning from your work.
How to Self-Host an Art Blog
Now, if you're serious about generating a livable income from your art blog, I highly recommend self-hosting WordPress instead of using free blogging platforms like Medium.
Pros and Cons of Self-Hosting
By this, I'm referring to wordpress.org, not to be confused with the free blogging platform wordpress.com that I mentioned above. They're completely different things. While wordpress.org is technically free open-source software, you'll need to purchase hosting to install it.
While this route requires a little capital to start, the payoff is worth the extra effort. If you're serious about starting an art blog and building a brand, self-hosting WordPress is the way to go.
If you're still a little hesitant, that's totally okay! As I said earlier, starting a blog isn't very difficult. Additionally, you're in good hands. I'm going to make this as painless as possible for you.
1. Choose a Domain Name
A great deal of choosing a domain name for your art blog is a matter of personal preference; however, here are some good guidelines you can follow to get started:
Use a .com if possible. Despite the ever-growing popularity of other domain extensions, choosing a .com domain name is still preferable.
Make it brandable. The goal is to have something easy to recall so that people will remember your blog and hopefully return to it.
Don't limit yourself. A name like “contemporaryartonly” restricts you from expanding in the future. You'll be better off choosing a name that is a little broader.
Avoid hyphens and numbers. Try not to use hyphens and numbers in an attempt to get creative. People typically have trouble remembering stuff like this.
Choose a relevant topic. The domain name of your website must reflect the topic of your website so that visitors can better understand what your content is about. In this case, it should be related to nothing other than art.
Choosing a domain name is tricky since domain names can only be owned by one entity at a time. Therefore, you need to find an available domain name to purchase one. The good news is that several tools can help you do just that, but my favorite is Instant Domain Search.
Using Instant Domain Search, you can instantly check whether a domain name is available (as you type) by entering your desired domain name. You'll also get suggestions for similar domains as you type if the name you're looking for is already taken.
Start by typing in art-related domain names, and you'll see the results populate as you type. Pretty cool, aye?
2. Purchase Hosting
The next step to starting an art blog is to purchase hosting from a reputable web hosting company. This will be used to install your WordPress application.
Unlike thousands of other blogs, I will not suggest a lousy host like Bluehost. Why? Because people despise them, they're owned by Newfold Digital and aren't even BBB accredited. I made the mistake of using them many years ago, which was painfully awful.
Instead, we're going to use HostArmada. Why? Because according to the extensive performance testing I did a few months back, HostArmada constantly topped the charts and boasts fantastic reviews everywhere you look.
Additionally, the renewal fees for HostArmada are even cheaper than Bluehost! It's a win all around, no matter how you look at it.
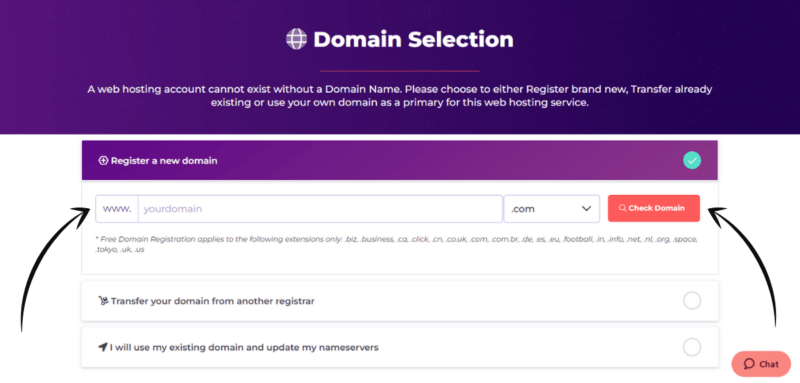
To complete this step, use the link above, enter your chosen domain name (see below) from earlier to register the domain, and continue to complete the checkout process.
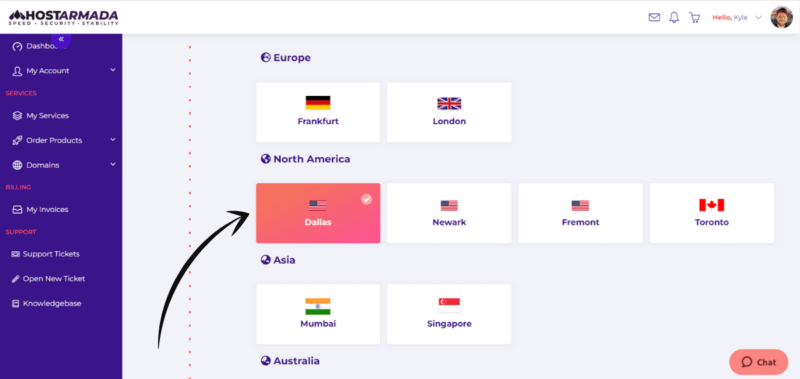
Make sure you select the data center closest to your target audience (or yourself if you're unsure).
Once you've purchased your hosting package (I recommended the Start Dock plan above), it's time to install WordPress.
3. Install WordPress
Before you can begin blogging, you must install your WordPress application. Follow the steps below to continue:
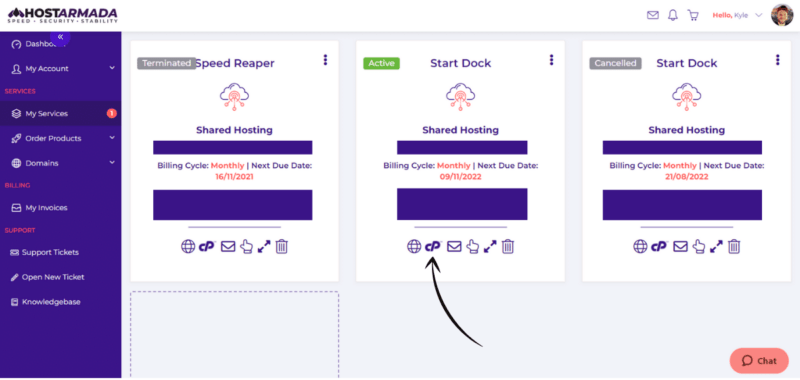
Step 1: Navigate to My Services and click to open the Control Panel.
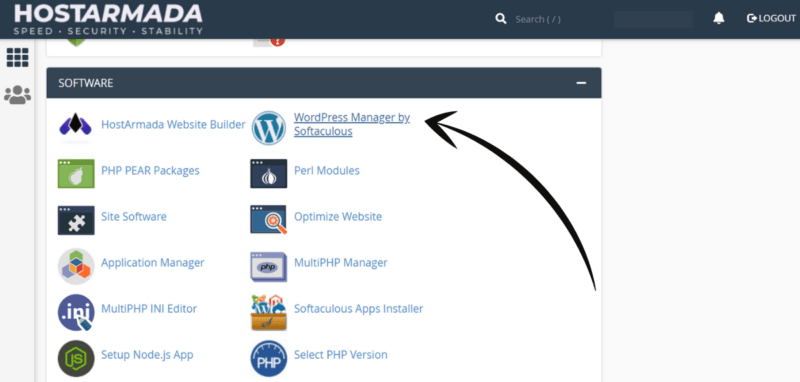
Step 2: Scroll down to the Software section and click WordPress Manager by Softaculous.
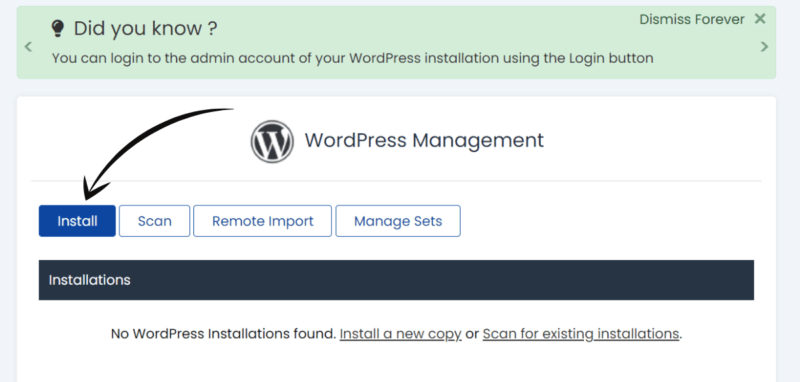
Step 3: Click Install.
Step 4: Check that the domain name is correct, and enter your desired Admin Username and Admin Password (no need to worry about anything else).
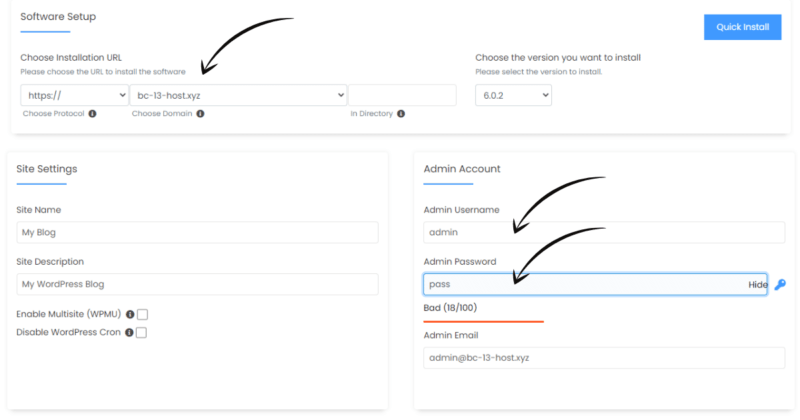
Step 5: Scroll down and click Install again.

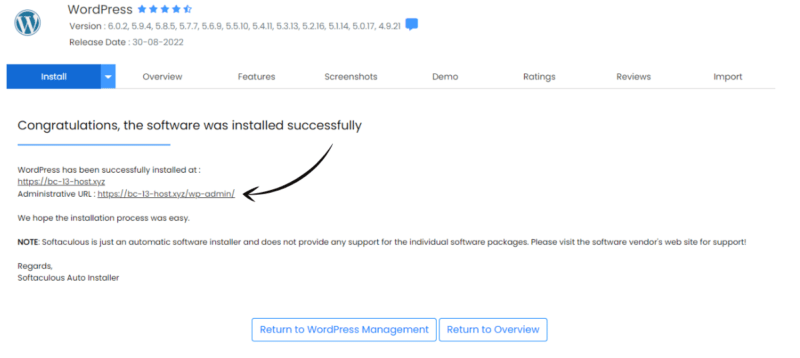
Now you can log in to your newly created art blog by adding /wp-admin/ to the end of your domain name. For example, mywebsite.com/wp-admin.
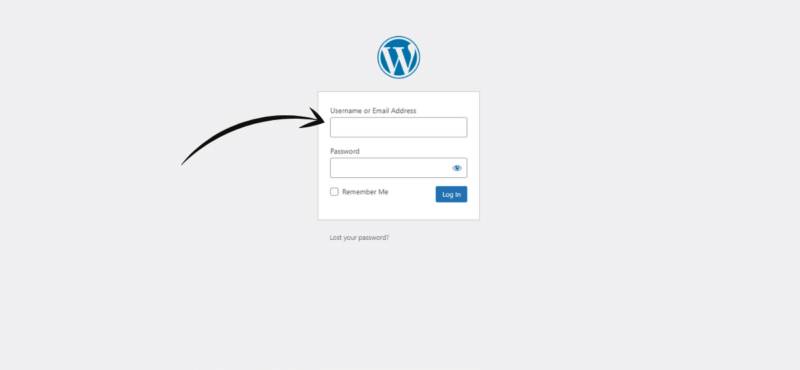
Use the username and password you created earlier to log in. And that's it. Your WordPress art blog is ready to go. Now let's install a theme.
4. Choose an Art Blog Theme
While you can use a free theme for your art blog, you'll constantly bang your head against the wall in frustration. Free themes lack a certain amount of customization most beginners require.
With that said, don't make the mistake of buying a bloated “multi-purpose” theme with all of the bells and whistles. Instead, opt for a lighter and more advanced WordPress theme, such as GeneratePress (the theme I'm using). Remember, your blog design is extremely important and shouldn't be overlooked.
Why Choose GeneratePress?
GenerarePress is one of the lightest WordPress themes available for WordPress. The founder, Tom Usborne, built GeneratePress, focusing on speed and usability. Combined with their revolutionary block-based page builder, GenerateBlocks, you're only limited by your imagination.
Not only is GeneratePress fast, lightweight, and easy to use, but the support team is nothing short of awesome! I've yet to see a single user's question go unanswered (and unsolved). Whatever you need help with, Tom (the founder) and his incredible team will gladly help you sort it out.
GeneratePress is the perfect theme for any art blog! Don't just take my word for it; check the reviews.
5. Install GeneratePress
After purchasing GeneratePress Premium, you'll need to install it and import a starter site from their Site Library. To do so, follow the steps outlined below.
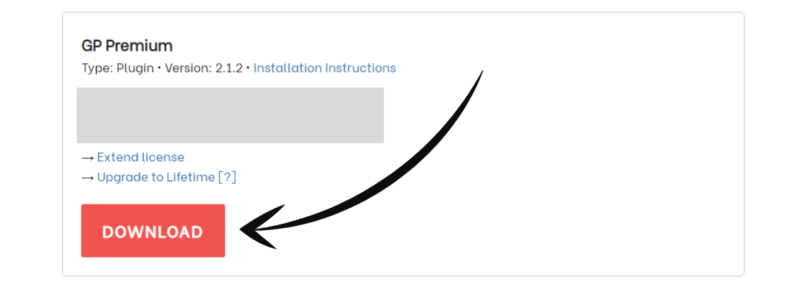
Log in to your GeneratePress and click Download. Note the license key here because we'll need it shortly.
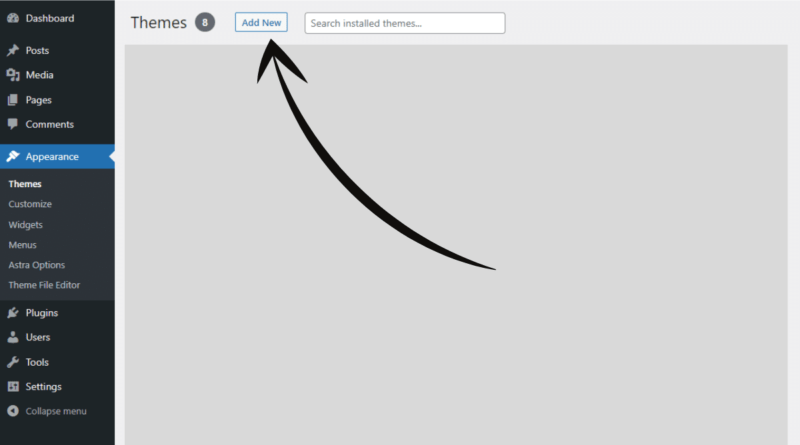
Step 1: Log in to your WordPress dashboard and navigate to Appearance > Themes > Add New.
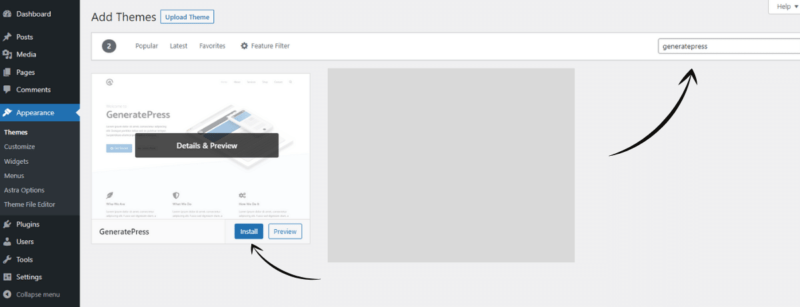
Step 2: Type GeneratePress into the search field, find GeneratePress, click Install, and then Activate.
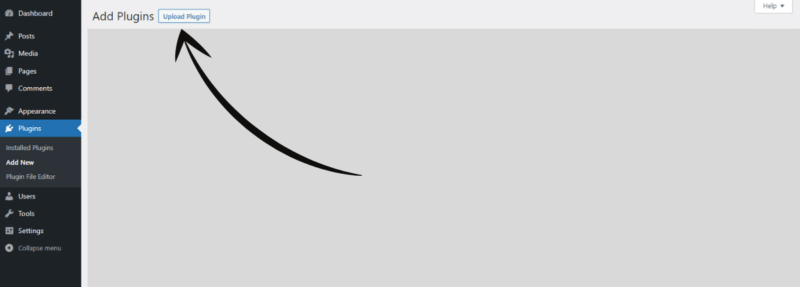
Step 3: Navigate to Plugins > Add New > Upload Plugin.
Step 4: Click Choose File and select your download file from Step 1. Afterward, click Install Now.

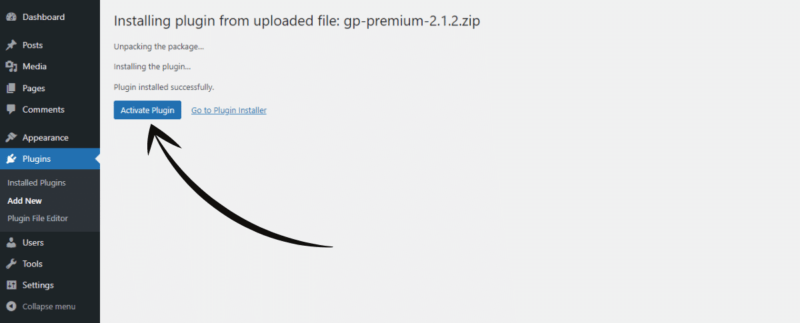
Step 5: Click Activate Plugin to continue.
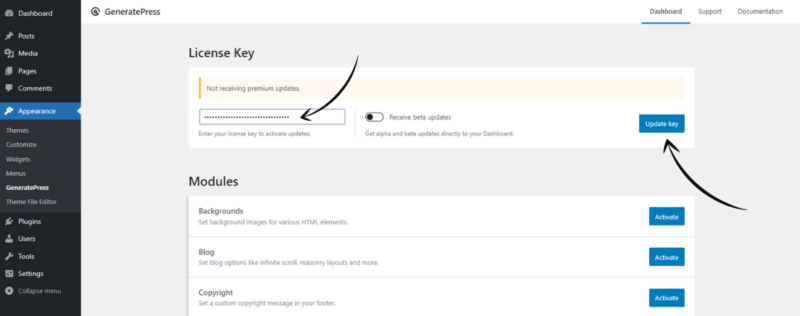
Step 6: Navigate to Appearance > GeneratePress and enter your license key from Step 1.
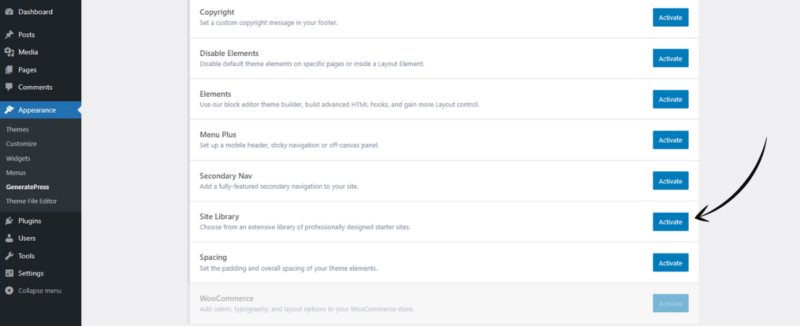
Step 7: After entering your license key, scroll down and activate the Site Library module.
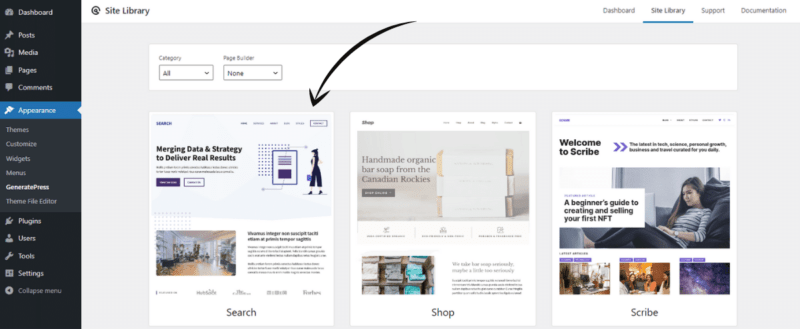
Step 8: Click Open Site Library.

Step 9: Scroll through the Site Library's themes and choose the one you like. You can always come back and import others if you wish, so don't put much thought into it. Just choose one.
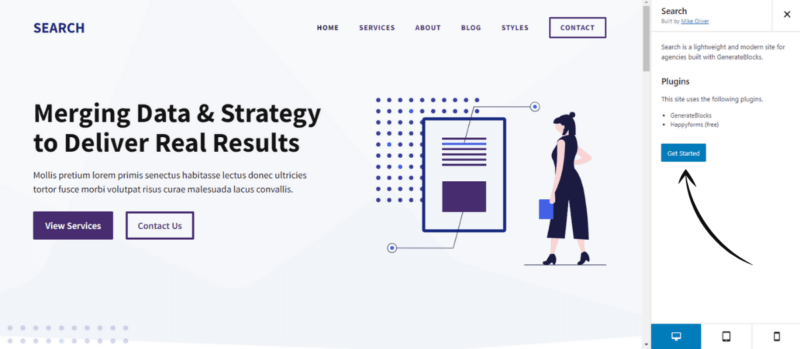
Step 10: Click Get Started.
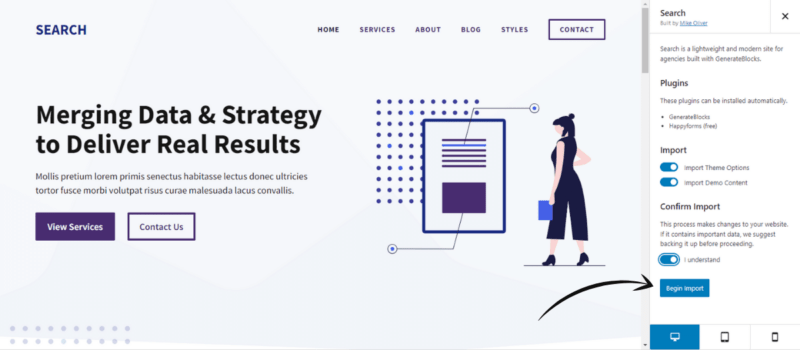
Step 11: Toggle I Understand and click Begin Import.
And that's all there is to it. Your new art blog is ready to go. To customize your theme, look in the following locations:
- Menu – Appearance > Menus
- Site Settings – Appearance > Customize
- Posts – Posts > All Posts
- Pages – Pages > All Pages
- Other – Appearance > Elements
Note that you can also navigate to the page/post you wish to edit on the front end and click Edit Page, Edit Post, Customize, or Elements from the top admin bar.
Other Art Blog Themes
Here are some art-specific WordPress themes to help with more refined functionality and features.
While the above themes are great, I still recommend using GeneratePress and extending the functionality with plugins like Envira. You'll have much more control over the design and functionality of your blog.
6. Install Art Blog Plugins
WordPress is so fantastic because of the overwhelming amount of plugins designed to increase the quality of life for WordPress web admins. Without plugins, the average Joe wouldn't be able to do much at all. Use the following steps to install WordPress plugins.
Method One
- Navigate to Plugins > Add New
- Click Upload Plugin
- Click Choose File (select your downloaded plugin)
- Click Install Now
- Click Activate Plugin
Method Two
- Navigate to Plugins > Add New
- Use the search field to search for plugins
- Find the plugin and click Install > Activate
Recommend Plugins to Install
Envira – A drag-and-drop image gallery that is lightweight, 100% responsive, mobile-ready, optimized for speed, and feature-rich.
Modula – This plugin specializes in responsive grid galleries, whether you're creating a standard grid or customizing your grid to achieve a mosaic-like functionality.
Optimole – Improves images in real-time using a cloud-based image processing platform to optimize your site's performance and provide high-quality images for every device. With a simple click, you can get started improving your site immediately.
Rank Math – A Search Engine Optimization plugin that makes it easy for anyone to optimize their content with built-in SEO suggestions based on widely-accepted best practices.
CSS Hero – Tweak any website easily without any CSS knowledge or bloated plugins. CSS Hero is lightweight and capable of just about anything.
BulletProof Security Pro – This highly-rated WordPress security plugin has everything you need to lock down your website, and it comes complete with a one-click setup wizard.
FlyingPress – A blazing-fast caching plugin for WordPress built specifically to pass Google Lighthouse criteria.
GenerateBlocks – A block-based page builder by GeneratePress built for speed and versatility.
WPS Hide Login – If you don't opt for an all-in-one security plugin, you must at least hide your login URL from the rest of the world.
7. Create First Art Blog Post
To create the first post for your art blog, navigate to Posts > Add New from the WordPress dashboard, and you'll be treated with the Gutenberg editor.
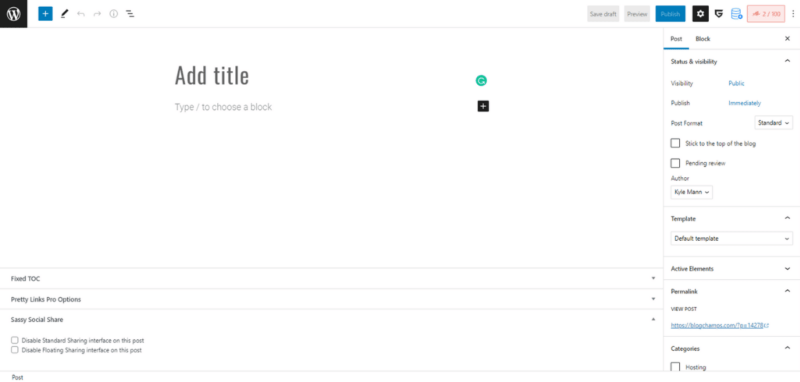
This is where you'll write and publish all of your new posts.
Branding Your Art Blog
In the business world, branding is a complicated subject that many people spend their entire lives studying. In the blogging world, however, it isn't that serious. Here's what I recommend:
Create a Unique Logo
The first thing you need to do is create a unique and memorable logo. You can hire a designer on Fiverr to create it or give it a go yourself using a tool like Canva or Vectr.
The little icon that is used for browser tabs and search results is called a favicon and typically has a dimension of 512×512 pixels.
Choose a Color Scheme
After creating your unique logo, you'll need to decide on a color scheme for your blog. For example, I use a derivative of navy blue, gold, and white on Blog Champs. You can generate random color schemes on color.co.
Use Consistent Styling
Each post and page on your art blog needs to bare a consistent style and flow. This includes your chosen colors, writing style, and the position of your page elements.
Growing Your Art Blog
As I mentioned earlier, starting an art blog is easy; however, growing and managing your blog will be challenging. Here are my recommendations to help you scale your new blog.
Keyword Research
Use a tool like Ahrefs Keyword Explorer to find low-difficulty keywords in your niche. The idea is to optimize your content around key terms to help users worldwide discover you in search engine results pages (SERPs) such as Google and Bing.
if you're operating on a budget, I recommend using Google's free Keyword Planner.
Writing With AI
Writing takes a ton of time, but the research involved for each post requires even more time! Yeah, it's a lot. To be a successful art blogger, you must ensure that your writing is factual, impeccable, and SEO-optimized. Trust me, it's a ton of work!
To simplify this troublesome article writing process, I wholeheartedly recommend that every blogger use a content optimization/creation tool like Frase.
Want to speed up and supercharge your content brief with powerful competitor insights? With Frase, you can:
- Expedite writing with 40+ AI writing templates
- Get word, image, and heading count suggestions
- Perform deep-topic research to outrank your competitors
- Create outlines automatically using AI technology
- Create outlines manually by analyzing top URLs
- Add top questions from your topic to your outline
- Add top citations from your topic to your outline
- Analyze NLP-extracted key terms on your topic
- Write faster with advanced AI writing technology
- Focus on content creation instead of keyword research
Hire a Writer
If all else fails, you can simply hire a freelance art writer! Don't think of this as cheating. Your writer will be a valuable part of your blogging team that assists you in creating your vision. They're just helping you get it out to the world.
Helpful Blogging Resources & Tools
Here are some other useful WordPress and blogging resources to help you along your blogging journey.
Frequently Asked Questions
What do art bloggers do?
Depending on their niche, artists and art bloggers write about various topics such as career advice, art marketing, or painting and drawing tips, or you can share things you've learned from personal experience.
Why start an art blog?
Starting an art blog is a brilliant idea for many reasons. Maybe you know a lot about a particular art-related hobby and want to share that knowledge. You may simply enjoy writing about art and are passionate about it. You can connect with like-minded people by building a community and honing your skills. Or you might want to make a living from your passion by selling your art projects.
How much will it cost to start an art blog?
Using a free blogging platform like Medium makes starting an art blog completely free. The downside of this route is that it limits your capabilities. The freedom and possibilities of self-hosting an art blog are much more significant. You can get started for as little as 2.99/month with HostArmada's Start Dock Plan, which includes a FREE domain.
Conclusion
Starting an art blog can be a profitable and life-changing experience. If you've been on the fence about it, I highly recommend you start blogging today so that you'll be that much more ahead tomorrow!